-
AuthorPosts
-
May 5, 2007 at 11:55 am #1090
Travis Harper
MemberI know this has been discussed but I cant find it.
First of all. I read a thread that says you screw your spoil board down to the table?
2. I thought I read that some of you are putting silicone around the edge of your spoil board, is this true?
3. The AXYZ guys said if I plane off the top of my spoil board it will start to bow up on the outside edge. I guess the screws would fix this problem.
4. Off the subject. My new cnc has 3 pop up pins for aligning material but if I put a 12′ peace on there I am off about 3/16 by the time it gets to the end of the table. Any thouhgts on this ??
May 5, 2007 at 12:55 pm #19474Andy Graves
KeymasterWe screw down the spoilboard.
I painted the edge of it just to contain the suction to the top and not the edge. No leaks is better not required.
When you plane the top you also have to plane the bottom first. That should take the obvious bow out of the material. Once you plane it (if you don’t the board won’t work) the spoilboard will change with the weather because it sucks up the moisture in the air.
Not sure what you are referring to about the”being off 3/16 of an inch” Explain further, I would be glad to help.
May 5, 2007 at 1:25 pm #19479Memberok on the pop up pins. There are three of them. 1 on the y axis and 2 on the z axis creating an L shape. But when I line material up on them by the time I am to the end of the table on the x axis, the material is about 3/16 in the table on going in the y axis direction. Almost like the pins are not exactly square with the table.
May 5, 2007 at 1:36 pm #19481KeymasterThe pins on the x axis that go the long direction down the length of the machine must be lined up absolutely parrallel to the x axis of the machine.
Lets say you put a pointed router bit in the spindle (vgroove bit, or engraving bit) and position the point directly over the top of the pin on the toward the inside of the table where the material would actully touch the pin. Now move the spindle using the x axis travel button and move it all the way to the other pin at the opposite end of the table. As long as you don’t move the y axis at all, the point of the bit should be directly over the pin where material would hit the pin.
This is a very simple way to tell. I am sure there are other ways to determine if it is accurate.
May 5, 2007 at 1:42 pm #19482MemberAndy, the pins are only about 24″ apart (oc). A total of about 45″ from the y pin to the center of the last x pin. My machine has a laser digitizer on it. I set the laser on the very edge of the first pin and then moved down to the second pin and you can tell in that short distance that it is off. What do you think? machine not moving exatly staight or the pins are not exactly sqare to the table ?
May 5, 2007 at 1:47 pm #19483MemberI ran the laser on the edge of the table from one end to the other and it is exactly on. I would have to say my pop up pin is off slightly. I dont suppose there is any fixing that.
How do you line your material up to make sure your straight? Not a big deal somtimes but when you are very tight and only taking a 1/16 or less off the front edge it is very important that your material is straight.
May 5, 2007 at 4:43 pm #19493Tom M
MemberTravis,
The simpleist explaination is that the pins are off the axis, like Andy said. Not sure if that’s the case, but it’s a good bet.
We don’t have the pins. If you need to line up the edge dead-on, run a ghost pattern. That’s the easiest way to be sure, because it is the machine telling how the machine reads the file. All you really need to do is one long edge if width is your only concern.
We use a 3/4″ or better spoilboard, screwed down, and plane off as needed. The screws are counter-sunk into the board, allowing us to run several leveling procedures before we need to change the board.
If your doing inlays or use the onion skin technique that I first saw here on FabNet, planing is more necessary than if your routing through the material. I never noticed a major warping, but if we get a sudden humidity change (this is the season for it), we just replane it.
Tom
May 7, 2007 at 9:06 am #19565Wade Stein
MemberTravis,
I had the same problem with my AXYZ. You can adjust the pins, it is a pain in the a-s. What you have to do is use a allen wrench and go from under the table and twist your arms in were the they don’t fit. Loosen the allen screws and turn the pin till it lines up with your laser or bit.
Wade
May 7, 2007 at 9:58 am #19566KeymasterTravis H wrote
I ran the laser on the edge of the table from one end to the other and it is exactly on. I would have to say my pop up pin is off slightly. I dont suppose there is any fixing that.
How do you line your material up to make sure your straight? Not a big deal somtimes but when you are very tight and only taking a 1/16 or less off the front edge it is very important that your material is straight.
Here is what we do (we have no pins). Use a thick SB, something 3/4″ or better. Plane back side with CNC. Position and screw down to CNC. The suck down the spoilboard and resurface. To line up the material, we make a pattern of the perimeter of the table and come in about 1/8″. We cut that pattern on the SB down about 1/2″. Now we know exactly where the edge of the material needs to be.
Just place the material on the CNC, line up with the cut line. Make sure you create a new home position at that exact point where you cut down into the spoilboard.
The great thing about this method, is that you allow the CNC to determine a perfect line. Once cut it stays perfect, unless the machine gets out of wack.
I will try to post a picture if I can remember.
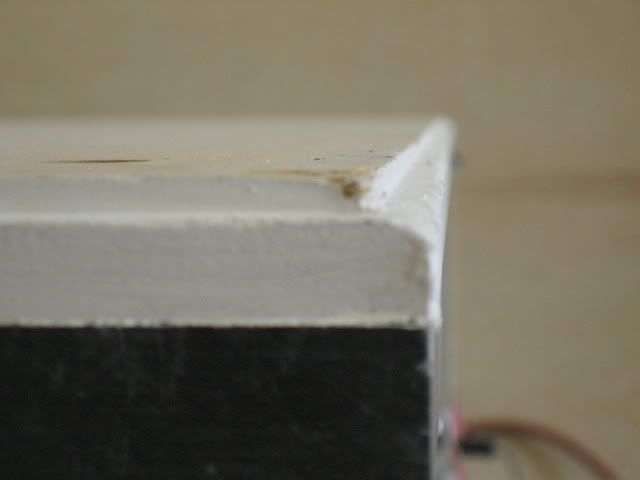
May 12, 2007 at 6:29 pm #19877KeymasterThis is our spoilboard.
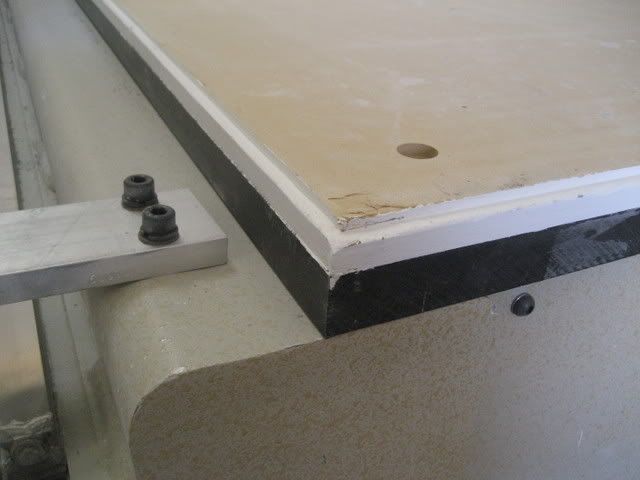
This is the closeup:
-
AuthorPosts
- You must be logged in to reply to this topic.